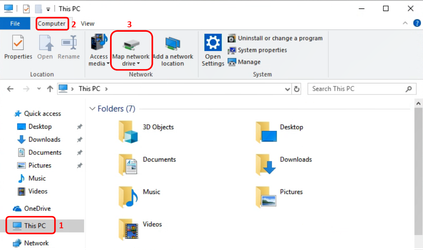
There are multiple way's to map a shared drive. Some of the way's are outlined below in different sections


net use * \\remotepc\share /u:domainname\username password /persistent=yes |
Using an asterisk(*) will select the next available drive letter to map the drive. If a particular drive letter is needed, replace the asterisk with the drive letter and a semi colon. Example: net use s: \\remotepc\share
\\remotepc\share is the network share that the mapped drive will be pointing to.
/u: is only needed if using a non domain joined computer, such as a personal device. This allows different credentials to be used rather than using the currently signed in user.
/persistent=yes will reattach the drive automatically at next login if it is available. This tag is optional and if left out, the default is no.
| Drive letters used by other disks will not appear. Sometimes computers will assign a drive letter to other built-in storage devices and consume a drive letter. |
Florida Polytechnic Files can can be used remotely with mapped drives while connected to the VPN. |
Tags: map, network share, network drive, shared drive, map folder
The content by label feature displays related articles automatically, based on labels you choose. To edit options for this feature, select the placeholder below and tap the pencil icon.
|